Badazzrangers | home
My Truck | Member Gallery | Chat Room | Products and horsepower increases | Videos and Audio | How-To Section "3.0 FURY" | Promotional Articles | Links | Contact Me
How-To Section "3.0 FURY"

Please understand that my instructions are not entirely thorough, but if you have any questions, please email me at Dangerranger02@aol.com and I will explain the details with an even more indepth analysis.
* I DO NOT HOLD RESPONSIBILITY FOR YOUR ACTIONS. PERFORM AT YOUR OWN RISK!
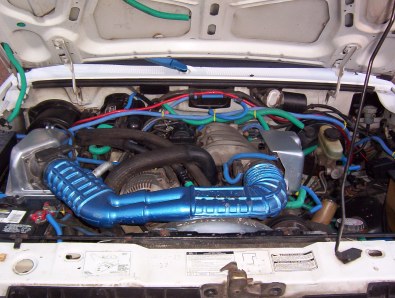
The following are some of the upgrades I have performed on my vehicle.
Table of Contents
I. Flame Exhaust
II. MAFS conical air filter adaptor
III. Cone Air Filter
IV. Cold Air Intake
V. Underdrive pulley
VI. Electric Fan
Miscellaneous Tech:
I. Speaker wire listing for 92 ranger
I. Flame Exhaust: (I have installed this version on my vehicle, and it does work...see audio and video section for details...)
There are two ways to make this to my knowledge......
Tools:
1) Drill
2) Metal Drill Bit
3) 14-18 gauge wire (speaker wire is fine)
4) welding machine
5) Spark plug
6) Tap (makes the necessary grooves for the spark plug to screw into your exhaust tip)
7) Automotive Power Coil (I used a stock coil off a 51 chevrolet, so any should work)
8) Spark plug wire (for connecting the coil to the spark plug)
9) Tie straps (for mounting your power coil, and securing all wires)
10) A big set of BALLZ....LOL
1st way to make the flames!
(This way flames up when you slam on the gas; however, the additional power coil robs too much power from the one in your vehicle so the vehicle will stall if you hold the gas down for too long. When you punch the gas, your rpms go down instead of up.)
Step 1:
~Find a good mounting place for the power coil. You want the coil to be near your tip, because you have to connect a wire from it to the spark plug. When you find a good place, mount your coil. (I strapped the coil in using 2 metal screw straps, but plastic pull straps will work fine. I also mounted the coil on the bed brace on the passenger's side connecting to the frame.)
Step 2:
~Mount your spark plug 3 to 5 inches from the exit of your exhaust. You will have to drill a hole just smaller than the threads on your spark plug. Then tap the hole so the plug can screw in. You can also drill the hole larger than the threads, put the plug through the hole, and tighten it with a nut on the inside of the pipe. (I drilled and taped the hole in the tip, screwed in the plug, and tightened a nut on the inside. I suggest using a long shank plug. Any type will do.)
Step 3:
~Now, run a wire from the negative terminal on your vehicle's stock power coil, to the negative terminal on the addition power coil that feeds the spark plug mounted in your exhaust tip.
Step 4:
~Run a wire from the positive terminal on your vehicle's battery to an ON/OFF switch mounted inside your cab. Then run another wire from the switch to the positive terminal on the power coil you mounted in the rear.
Step 5:
~Run the spark plug wire from the additional power coil to the spark plug you mounted.
Step 6:
~Crank up your engine. Let it warm up if needed. Now turn on the switch you mounted inside your cab. Rev the engine to about 2 grand slowly, then punch it to the floor. The exhaust should ignite but the additional coil robs too much power from your engine, so the rpms should gradually go down. When the tachometer hits 1000 rpms let off the gas.
2nd way to make the flames! (Only works on carbeurated engines with high octane, and true exhaust; no catalytic converters.)
Step 1:
~Find a good mounting place for the power coil. You want the coil to be near your tip, because you have to connect a wire from it to the spark plug. When you find a good place, mount your coil. (I strapped the coil in using 2 metal screw straps, but plastic pull straps will work fine. I also mounted the coil on the bed brace on the passenger's side connecting to the frame.)
Step 2:
~Mount your spark plug 3 to 5 inches from the exit of your exhaust. You will have to drill a hole just smaller than the threads on your spark plug. Then tap the hole so the plug can screw in. You can also drill the hole larger than the threads, put the plug through the hole, and tighten it with a nut on the inside of the pipe. (I drilled and taped the hole in the tip, screwed in the plug, and tightened a nut on the inside. I suggest using a long shank plug. Any type will do.)
Step 3:
~Run a ground wire from the additional power coil to your frame.
Step 4:
~Tap a wire from any spark plug wire to an ON/OFF switch mounted inside your cab. Then run another wire from the switch to the positive terminal on the power coil you mounted in the rear.
Step 5:
~Run the spark plug wire from the additional power coil to the spark plug you mounted.
Step 6:
~Crank up your engine. Let it warm up if needed. Now turn on the switch you mounted inside your cab. Rev the engine to see if the exhaust ignites. This version of the flame exhaust should not rob your engine's power, so you can floor it, and have flames without having to worry about stalling. I have not performed this application so I could not tell you if it works. For fuel-injected vehicles, this may not work. You will have to bust out all catalytic converters, and get a glasspack muffler. If it still doesn't work, you will have to run your fuel at a higher octane level.
--------------------------------------------------------------------------------------------------------------------
II. MAF conical air filter adaptor
YOU NEED TO HAVE A CONE AIR FILTER BEFORE MAKING THIS ADAPTOR
Step 1:
~ buy a 3" outer diameter shower head set from a hardware store
~ piece of computer paper; no lines
~ pencil
Step 2:
~ remove your air intake tube using either a flat-head screwdriver or a 5/16" socket
~ unscrew the maf sensor from the air intake box
Step 3:
~ with the maf sensor off the engine, place the side that was attached to the air box on the sheet of paper
~ using the pencil, draw the outline of the sensor on the sheet of paper, remember to mark the complete inside of the screw holes.
~ cut out the stencil you just drew, you may leave the holes uncut at this point.
Step 4:
~ on the flat side of the shower drain, place the stencil you just made and trace it off the paper
~ if you cut out the holes in the stencil, trace them also;
~ if you did not cut the holes, use a nail and mark the center of the hole, making an impression in the plastic
Step 5:
~ cut out the plastic using a jigsaw/ hacksaw/ utility knife
~ sand all edges down
~ using a drill bit just small enough to fit in the holes in your maf adaptor, drill holes into the shower drain set
~ sand for final finish
Step 6:
~ remove the stock air box completely
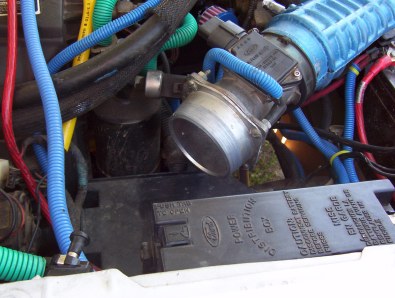
~ seal adaptor to mafs using a high temp epoxy
~ Mount the adaptor to your MAFS using a new set of bolts, lock washers, and nuts. Remember to seal the adaptor to the sensor with some type of high temp epoxy before bolting on.
~ You will also have to make a bracket to hold your new tube setup in place.
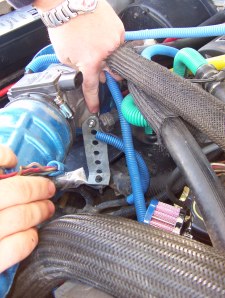
~ Make sure the tube does not hit your alternator pulley or a hole may be made into your intake. The third picture below shows where I mounted my custom bracket.
~ you will now need a cone air filter

(MAFS bracket)
DO NOT RUN MOTOR WITHOUT THE AIR FILTER
--------------------------------------------------------------------------------------------------------------------
III. Cone Air Filter
(On my truck, I had to make a Mass Air Flow Sensor adaptor)
Step 1:
~Buy a cone air filter. What type and brand is your personal preference. I prefer a blue cone to match my wireloom. The brand is generic.
Step 2:
~ you must have a mafs adaptor (see part II)
Step 3:
~Attach the cone air filter by sliding it onto the MAFS Adaptor using a screw tight clamp.

Step 5:
~New bracketry may have to be made to secure the setup in place. Make sure your intake tube's new position is not rubbing on the alternator belt or any other moving parts that may cut or wear a hole into your intake tube. ( I built a metal bracket and connected it from my mafs bottom bolt nearest the motor to the oem screw that was attached to the stock air box. Picture is below.)
~NOTE: This is not a cold air intake. This setup uses the air underneath your hood, but your throttle response is increased dramatically over stock and a throatier exhaust tone may be noticed. If you would like to make the cold air intake, see the next how-to section below.
--------------------------------------------------------------------------------------------------------------------
IV. Cold Air Intake
Step 1: I will perform this modification in the near future. Pictures will be posted afterwards.
~After completing the cone air filter upgrade, you can make it a true cold air intake. You will have to make a sealed box, much like the stock one that came with your vehicle from the factory.
~You need to buy a highly flexible metal material, such as aluminum to make the box.
Step 2:
~Mold the metal around the cone air filter while making sure to leave enough room for the electronic components surrounding and the closing of your hood. Room is really hard to find. There is no set shape to this box, but I recommend a cylinder shape, or rectangle.
Step 3:
~After creating your filter box, the hard work is finished. Next, you will have to attach a hose to your box leading outside the vehicle, so cold air can be drawn in. I recommend using a temperature resistant flexible house at least 3" in diameter. ***NOTE: Instead of completing the hose, you may drill holes into the fender well; which is the bottom of your air box. Water is more prone to getting into the filter, so I recommend the hose.
~Connect the hose to your custom filter box. First, cut a hole in the box where you would like the hose to connect. Make sure everything will fit right. Now, seal the hose to the box with a high temp epoxy.
Step 4:
~Run the flexible hose to the exterior of your vehicle. I recommend right behind the front air dam, but you can mount it under your fender well if you have room.
--------------------------------------------------------------------------------------------------------------------
V. Underdrive Pulley for the 3.0 vulcan
Step 1: I bought my 20% reduction crank ASP pulley from Summitracing.com. It was $85.34 which included s. & h.
Part # ASP-821120
Step 2: Take off the negative terminal on your battery. Put your manual tranny into gear, or place your automatic into park.
Step 3: You will have to remove your stock fan in order to easily reach the crank pulley bolts. Use a wrench and a rubber hammer to tap loose. *Note: The pulley the fan is attached to is not the pulley you are replacing. For 3.0 fan unscrewes clockwise, 4.0 counter clockwise.
Step 4: To remove the fan completely, you will have to remove the fan shroud. Only two screws hold it into place. Afterwards, remove the shroud and fan completely.
Step 5: Take out the four bolts holding the stock crank pulley. Hold the pulley still using a rachet on the center bolt, using another rachet, take the bolts out.
Step 6: Remove the old belt, and after tightening the new crank pulley, place the new belt on using the belt tensioner. New belt for 3.0 with A/C: Dayco P/n 5060870
Step 7: Torque the pulley bolts to 45 ft. lbs.
Step 8: Reattach your fan and shroud.
Step 9: Crank your motor and check for any slippage or misalignment in your new setup.
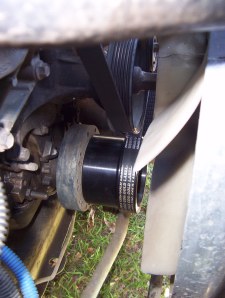
Step 10: That's it! You're done! Now sit back and enjoy the fruits of your labor! Torque is highly noticeable on my truck so HP must be there too! Completed project picture below.
The installed power pulley
--------------------------------------------------------------------------------------------------------------------
VI. Electric Fan
Step 1:
--------------------------------------------------------------------------------------------------------------------
Miscellaneous Tech.
I. Speaker wire listing
Having trouble figuring out which wires lead to which speaker? Well here is a listing for the 92 ranger. The same color wires may have been used on your vehicle. I recommend doing more research to make sure these apply to your vehicle.
Front left (driver's side)
positive = orange with green stripe
negative = light blue with white stripe
Front right (passenger's side)
positive = white with green stripe
negative = green with orange stripe
Rear left (driver's rear)
positive = pink with green stripe
negative = tan with yellow stripe
Rear right (passenger's rear)
positive = orange with red stripe
negative = black with white stripe